

Window inserts offer significant benefits with just 30 minutes of installation time. You’ll reduce noise by up to 70% on single-pane windows and cut energy costs by up to 20% through improved thermal performance. Choose between magnetic or compression-fit designs for DIY installation without specialized tools. Simply measure your window frames, clean the surfaces, and secure the inserts using manufacturer-provided materials. Proper installation techniques guarantee excellent performance and durability for your investment.
Understanding Window Insert Technology

Window inserts deliver exceptional performance through their specialized dual-barrier design. You’ll find that these soundproof window inserts create a thermal buffer zone between your existing windows and living space, effectively separating warm and cool air masses. The engineered gap between the panes considerably reduces noise transmission by interrupting sound wave paths and minimizing vibrational energy transfer.
When you’re considering energy efficiency upgrades, window inserts offer superior thermal performance compared to traditional single-pane windows. The technology works by establishing multiple protective layers that enhance both acoustic and thermal isolation. You’ll appreciate that the design allows for noise reduction while maintaining easy access for maintenance. The insert’s engineering enables quick installation without specialized tools, and you can remove them whenever necessary for cleaning or seasonal adjustments. This practical approach to window enhancement delivers measurable benefits without complex modifications.
Types of Window Inserts Available Today
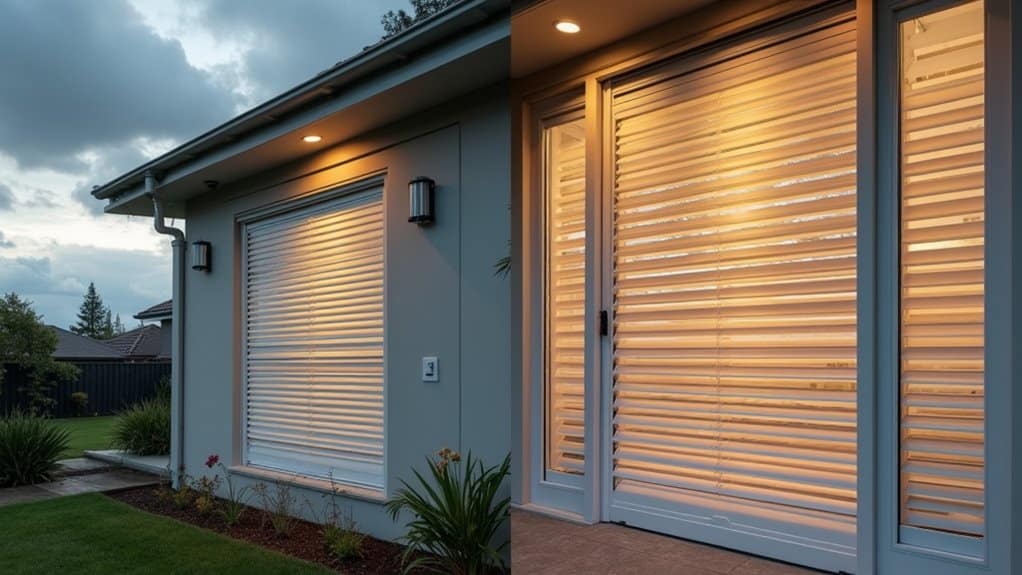
Several distinct window insert designs dominate today’s market, each offering unique advantages for your installation needs. Magnetic window inserts represent the most reliable option, utilizing strong magnets to secure the pane firmly in place. You’ll find these inserts are easy to install and remove, making seasonal changes effortless.
Compression fit inserts, while common, employ silicone tubing around the edges to create a secure seal. However, you’ll need to exercise caution with this design, as the installation process can potentially lead to pane breakage during removal. Additionally, the compression mechanism may deteriorate over time, compromising the insert’s effectiveness.
Both types support DIY installation, eliminating professional labor costs. You won’t need specialized tools or ladders for maintenance, and the straightforward installation process typically takes just minutes to complete.
Key Benefits of Window Insert Installation

Homeowners seeking enhanced comfort and efficiency will discover multiple compelling advantages when installing window inserts. You’ll experience significant sound reduction of up to 70% on single-pane and 50% on double-pane windows, achieving an STC rating of up to 45. For maximum noise control, specialized soundproof inserts can deliver up to 80% noise reduction with an STC rating of 49.
These installations help reduce your energy costs by up to 20% through improved thermal performance. You’ll maintain privacy while still enjoying natural light, as the inserts effectively diffuse incoming sunlight while blocking 98% of harmful UV rays. The practical 25-30 minute installation process requires no specialized tools, making it a convenient DIY project. You can easily remove the inserts whenever necessary for maintenance or seasonal adjustments.
Step-by-Step Installation Guide
Now that you understand the advantages of window inserts, let’s focus on proper installation techniques. Before you begin, guarantee you’ve selected the Right Window insert for your specific frame type, whether it’s for a double-hung or casement configuration.
Start by gathering the right tools for the job. You’ll need basic measuring equipment and minimal hardware, as these inserts are designed for straightforward integration. Position the cellular PVC insert within your existing window frame, ensuring it’s perfectly aligned. The installation process typically takes less than 30 minutes per window, requiring no major construction work. When installing ENVIROGUARD Casement Inserts, pay special attention to the weatherstripping to confirm proper sealing. Secure the insert according to manufacturer specifications, and verify that all components are properly fastened for maximum performance and durability.
Tools and Materials Needed

Essential tools for window insert installation are straightforward and readily available in most households. When preparing to install your soundproofing window inserts, you’ll need basic tools to guarantee the right fit and proper sealing for your replacement panels.
- Measuring Tools: A tape measure for precise window frame dimensions, verifying your inserts fit perfectly
- Cutting Tools: Sharp scissors or utility knife to trim compression tubes or magnetic strips to the exact length needed
- Installation Tools: A rubber mallet or wooden block for gentle, even pressure when securing the insert
Before beginning, clean your window frames thoroughly and organize your tools within reach. You’ll also need the manufacturer-provided adhesive or compression seals that came with your inserts. With these tools ready, you’re prepared to complete the installation within the standard 25-30 minute timeframe per window.
Common Installation Challenges and Solutions
While installing window inserts can be straightforward, you’ll likely encounter several common challenges that require specific solutions. When your window frame isn’t perfectly square, use adjustable mounting brackets to compensate for uneven surfaces. If you’re struggling to create a tight seal, clean both the frame and insert edges thoroughly with rubbing alcohol before applying the compression foam.
You might find it difficult to install and remove larger inserts. To address this, install temporary handling tabs on opposite corners, which you can remove after placement. For windows with deep sills, use extended mounting clips to guarantee proper depth. If condensation appears between the insert and window, add small ventilation holes at the bottom corners. Always check that safety latches remain accessible after installation for emergency egress.
Maintenance and Care Tips
To maintain your window inserts’ peak performance, you’ll need to establish a regular cleaning routine using a soft microfiber cloth and mild, non-abrasive detergent. Schedule seasonal inspections of your inserts’ seals and edges, particularly for compression-fit models, to verify they’re maintaining proper contact with the window frame. When cleaning or inspecting, take advantage of the inserts’ removable design to thoroughly clean both the insert surfaces and the underlying window components, ensuring ideal energy efficiency and noise reduction benefits.
Regular Cleaning Schedule
Maintaining your window inserts through regular cleaning guarantees ideal performance and prolongs their lifespan. To ensure optimal Sound Transmission Class (STC) ratings and smooth open and close functionality, you’ll need to establish a consistent cleaning routine that reduces noise interference and maintains clarity.
Follow these essential cleaning steps every 3-6 months:
- Remove the insert and wipe it down with a soft, lint-free cloth dampened with mild soap and water
- Clean both sides of the insert gently, avoiding abrasive materials that could compromise the noise-reducing properties
- Allow the insert to dry completely before reinstallation to prevent moisture damage and maintain seal integrity
Store your inserts properly between cleanings, and you’ll enjoy years of effective performance with minimal maintenance requirements.
Seasonal Performance Checks
Regular cleaning sets the foundation for window insert care, but seasonal performance checks take your maintenance to the next level. You’ll need to inspect window inserts thoroughly during spring and fall to guarantee optimal functionality.
During these biannual checks, examine the magnetic or compression seals for proper adhesion and airtight performance. Clean window inserts with mild detergent and a soft cloth, then inspect the frame for cracks or structural damage. If you discover any compromised components, replace the insert immediately to uphold energy efficiency.
Don’t forget to lubricate moving parts to guarantee smooth removal and reinstallation. These systematic performance checks help identify potential issues before they become major problems, extending your window inserts’ lifespan and maintaining their effectiveness as thermal barriers throughout changing seasons.
Energy Savings and Performance Metrics
Window inserts deliver substantial energy-saving benefits while improving your home’s acoustic performance. To reduce your energy bills, these inserts create an effective insulation barrier that prevents air movement, leading to energy savings of up to 20%.
Key performance metrics demonstrate their effectiveness:
- Acoustic grade inserts achieve an STC rating up to 45, reducing noise by 70% on single-pane and 50% on double-pane windows – equivalent to 18.9 dBAs reduction
- UV protection reaches 98%, safeguarding your furniture, floors, and artwork from fading while enhancing energy efficiency
- Shade Grade inserts optimize thermal performance by diffusing solar rays while maintaining natural light transmission
These measurable benefits make window inserts a technically sound solution for improving your home’s energy performance while providing substantial noise reduction capabilities.
Best Practices for Long-Term Results
To maximize the long-term performance of your window inserts, proper installation and ongoing maintenance are essential components of success. You’ll Need to Know that securing inserts tightly within the frame prevents air leaks and maintains energy efficiency benefits similar to new windows.
Make sure you’re following the manufacturer’s recommended installation methods to achieve a proper seal. Choose corrosion-resistant materials and high-quality components that’ll withstand daily use and environmental factors. Regular maintenance includes wiping down both the frame and glass surfaces to prevent degradation of the seal.
For ideal results, consider consulting professional installers who can guarantee precise fitting and proper sealing techniques. Their expertise helps prevent common issues like rattling or seal failure, ultimately extending your window inserts’ lifespan and maintaining their effectiveness.
When to Replace Your Window Inserts
Keep an eye out for common wear indicators like drafts around the edges, visible gaps between the insert and frame, or persistent condensation between panes, as these signal it’s time for replacement. You’ll want to perform thorough inspections during seasonal changes, particularly in fall and spring, when temperature variations can reveal seal failures or performance issues. While inserts typically last 5-10 years, you should replace them immediately if you notice cracked glass, warped frames, or compromised weatherstripping that affects their thermal performance.
Common Wear Signs
Knowing when to replace your window inserts is essential for maintaining your home’s energy efficiency and comfort. Outdated windows can lead to increased outside noise and compromised insulation. Everything You Need to know about wear signs can help you make timely replacements.
Watch for these critical indicators:
- Visible deterioration including cracked or peeling compression seals, which compromise the insert’s effectiveness
- Persistent condensation or frost accumulation between window panes, indicating seal failure
- Operational issues when opening or closing the window, often caused by degraded materials
Most window inserts require replacement every 10-15 years as materials naturally degrade. Don’t wait for complete failure monitor your inserts regularly for these warning signs. Early detection and replacement will maintain paramount energy efficiency and prevent more costly repairs down the line.
Seasonal Replacement Guide
Two ideal times exist each year for replacing your window inserts: spring and fall. You’ll want to swap out heavier insulation in spring to guarantee cooling efficiency as temperatures rise. When your window without proper seasonal inserts struggles to maintain indoor comfort, it’s time for a change.
Another option is to schedule your replacements based on your local climate patterns. Install lightweight inserts before peak cooling season to reduce energy costs and enhance air conditioning performance. In fall, switch to insulated versions to prevent heat loss and minimize drafts during winter months.
For optimal timing, check your local weather forecasts and contact form submissions from previous years to monitor when you’ve traditionally made the switch. This proactive approach guarantees you’re always prepared for seasonal temperature changes.
Frequently Asked Questions
How Long Does It Take to Install a Window Insert?
You’ll typically need 25-30 minutes to install each window insert, making it a quick solution for improving your home’s energy efficiency, heating and cooling performance, and noise reduction. For safety and favorable results, confirm you’ve measured accurately and have all necessary materials ready. If you’re using magnetic inserts, you’ll find installation even faster since they snap into place securely. With proper preparation, you can complete multiple windows in a single afternoon.
How Long Do Window Fitters Take?
Professional window fitters typically spend 2-4 hours per window for full-frame installations. While you’ll need to account for this longer timeframe with traditional installations, you can drastically reduce installation time by opting for window inserts, which take just 25-30 minutes each. Window insert installation requires minimal tools, and with proper window insert maintenance, you’ll enjoy a considerable window insert lifespan. This makes inserts an efficient alternative to traditional window replacement.
How Long Does It Take a Contractor to Install a Window?
A contractor will typically take 4-8 hours to complete your window installation process, ensuring proper window insulation efficiency. Your window replacement timeline can vary based on complexity, window size, and structural requirements. You’ll notice contractors follow precise steps: measuring, removing old windows, preparing the opening, installing new frames, testing operation, and sealing. Weather conditions and accessibility may extend this timeframe, but it’s essential not to rush for ideal safety and performance.
How Much Does It Cost to Replace a Window Insert?
You’ll typically spend between $50-$150 per window insert, with pricing varying based on size and style. Magnetic window inserts offer the most budget-friendly option at $50-$100, while compression fit inserts run $100-$150. Window insert durability depends on the materials chosen, with high-quality options lasting 5-10 years. To maximize your investment, perform regular window insert maintenance, including cleaning the seals and checking for proper fit every six months.